SpringBoot2。x系列教程|SpringBoot中整合WebSockets
作者:一一哥
一。 WebSockets簡介
1。 什麼是Websockets
WebSocket是HTML5的一種新的網路通訊協議,它實現了服務端與客戶端的全雙工通訊,建立在傳輸層TCP協議之上,即瀏覽器與服務端需要先建立TCP協議,再發送WebSocket連線建立請求。
2。 為什麼要有WebSockets
網路通訊已經有了http協議,為什麼還需要WebSocket協議?
因為http協議有一個缺陷,通訊只能由客戶端發起請求,伺服器端返回查詢結果。
比如說我們想要獲取一個實時的新聞資訊,在每次更新新聞資訊後,我們都需要重新整理頁面才能獲取到最新的資訊,只有再次發起客戶端請求,伺服器端才會返回結果。但是伺服器端不能做到推送訊息給客戶端,當然我們可以使用輪詢,檢視伺服器有沒有新的訊息,比如 “聊天室” 這樣的,但是輪詢效率是非常低的,因此WebSocket就這樣產生了。

3。 WebSocket建立連線過程
客戶端傳送請求資訊,服務端接收到這個請求並返回響應資訊。當連線建立後,客戶端傳送http請求時,透過Upgrade:webSocket Connection:Upgrade 告知伺服器需要建立的是WebSocket連線,並且還會傳遞WebSocket版本號、協議的字版本號、原始地址、主機地址, WebSocket相互通訊的Header很小,大概只有2Bytes。

4。 WebSocket的優點
WebSocket的最大優點就是
伺服器可以主動向客戶端推送訊息,客戶端也可以主動向伺服器端傳送訊息
。
使用WebSockets可以在伺服器與客戶端之間建立一個非http的雙向連線。這個連線是實時的,也是永久的(除非被關閉)。
當伺服器想向客戶端傳送資料時,可以立即將資料推送到客戶端的瀏覽器中,無需重新建立連結,只要客戶端有一個被開啟的socket(套接字)並且與伺服器建立連結,伺服器就可以把資料推送到這個socket上。
5。 WebSocket的前端API
5。1 建立連線
WebSocket需要接收一個url引數,然後呼叫WebSocket物件的構造器來建立與伺服器之間的通訊連結。
如下程式碼初始化:
var websocket = new WebSocket(‘wss://echo。websocket。org’);
注:
URL字串必須以 “ws” 或 “wss”(加密通訊)開頭。
利用上面的程式碼,我們的通訊連線建立之後,就可以進行客戶端與伺服器端的雙向通訊了。可以使用WebSocket物件的send方法對伺服器傳送資料,但是隻能傳送文字資料(我們可以使用JSON物件把任何js物件轉換成文字資料後再進行傳送)。
5。2 傳送訊息的方法
websocket。send(“data”);
5。3 接收伺服器傳過來的資料
透過onmessage事件來接收伺服器傳過來的資料,如下程式碼:
websocket。onmessage = function(event) { var data = event。data;}
5。4 監聽socket的開啟事件
透過獲取onopen事件來監聽socket的開啟事件。如下程式碼:
websocket。onopen = function(event) {// 開始通訊時的處理}
5。5 監聽socket的關閉事件
透過獲取onclose事件來監聽socket的關閉事件。如下程式碼:
websocket。onclose = function(event) {// 通訊結束時的處理}
5。6 關閉socket
透過close方法來關閉socket, 如下程式碼:
websocket。close();
5。6 WebSocket的狀態
可以透過讀取readyState的屬性值來獲取WebSocket物件的狀態,readyState屬性存在以下幾種屬性值。
CONNECTING(數字值為0),表示正在連線;
OPEN(數字值為1),表示已建立連線;
CLOSING(數字值為2),表示正在關閉連線;
CLOSED(數字值為3),表示已關閉連結。
二。 SpringBoot2。x整合WebSockets
1。 建立web專案
我們按照之前的經驗,建立一個web程式,並將之改造成Spring Boot專案,具體過程略。

2。 新增依賴包
3。建立WebSocket配置檔案
透過該配置類,開啟對WebSockets的支援。
package com。yyg。boot。config;import org。springframework。context。annotation。Bean;import org。springframework。context。annotation。Configuration;import org。springframework。web。socket。server。standard。ServerEndpointExporter;/** * @Author 一一哥Sun * @Date Created in 2020/5/13 * @Description Description */@Configurationpublic class WebSocketConfig { @Bean public ServerEndpointExporter serverEndpointExporter() { return new ServerEndpointExporter(); }}
4。 建立WebSockets的Server端
package com。yyg。boot。websockets;import com。alibaba。fastjson。JSON;import com。alibaba。fastjson。JSONObject;import lombok。extern。slf4j。Slf4j;import org。springframework。stereotype。Component;import org。springframework。util。StringUtils;import javax。websocket。*;import javax。websocket。server。PathParam;import javax。websocket。server。ServerEndpoint;import java。io。IOException;import java。util。concurrent。ConcurrentHashMap;/** * @Author 一一哥Sun * @Date Created in 2020/5/13 * @Description Description */@Component@ServerEndpoint(“/server/{uid}”)@Slf4jpublic class WebSocketServer { /** * 用來記錄當前線上連線數量,應該把它設計成執行緒安全的。 */ private static int onlineCount = 0; /** * concurrent包是執行緒安全的Set,用來存放每個客戶端對應的WebSocket物件。 */ private static ConcurrentHashMap
5。 建立Controller介面
package com。yyg。boot。web;import com。yyg。boot。websockets。WebSocketServer;import org。springframework。http。ResponseEntity;import org。springframework。web。bind。annotation。GetMapping;import org。springframework。web。bind。annotation。PathVariable;import org。springframework。web。bind。annotation。RequestMapping;import org。springframework。web。bind。annotation。RestController;import org。springframework。web。servlet。ModelAndView;import java。io。IOException;/** * @Author 一一哥Sun * @Date Created in 2020/5/13 * @Description Description */@RestControllerpublic class WebSocketController { @GetMapping(“/page”) public ModelAndView page() { return new ModelAndView(“webSocket”); } @RequestMapping(“/push/{toUID}”) public ResponseEntity
6。 建立前端頁面傳送訊息
<!DOCTYPE html>
【uid】:
【toUID】:
【Msg】:
【第一步操作:】:
【第二步操作:】:
7。 配置application。yml
server: port: 8080 servlet: context-path: /socketspring: http: encoding: force: true charset: UTF-8 application: name: websocket-demo freemarker: request-context-attribute: request prefix: /templates/ suffix: 。html content-type: text/html enabled: true cache: false charset: UTF-8 allow-request-override: false expose-request-attributes: true expose-session-attributes: true expose-spring-macro-helpers: true
8。 建立入口類
package com。yyg。boot;import org。springframework。boot。SpringApplication;import org。springframework。boot。autoconfigure。SpringBootApplication;/** * @Author 一一哥Sun * @Date Created in 2020/5/13 * @Description Description */@SpringBootApplicationpublic class SocketApplication { public static void main(String[] args){ SpringApplication。run(SocketApplication。class,args); }}
9。 完整專案結構

10。 啟動專案進行測試
我們需要在瀏覽器中開啟另一個頁面,網址都是:http://localhost:8080/socket/page

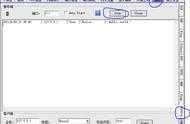
首先我們在第一個頁面中,輸入如下引數資訊,點擊發送訊息按鈕:

可以看到Console控制檯顯示的日誌資訊。
然後我們去Intellij idea中看看後臺列印的日誌資訊:

然後我們在第二個頁面中,輸入如下引數資訊,點擊發送訊息按鈕:

然後我們去Intellij idea中看看後臺列印的日誌資訊:

再然後我們回到第一個頁面,可以看到log中展示瞭如下資訊:

說明接收到了從另一個客戶端發來的資訊。
如果在第一個頁面中再次點擊發送資訊的按鈕,同樣的在第二個頁面中可以收到日誌資訊:

至此,我們就實現了WebSocket通訊。