前言
隨著各種社交論壇等的日益火爆,敏感詞過濾逐漸成了非常重要的也是值得重視的功能。那麼在Serverless架構下,透過Python語言,敏感詞過濾又有那些新的實現呢?我們能否是用最簡單的方法,實現一個敏感詞過濾的API呢?
敏感過濾入門
Replace方法
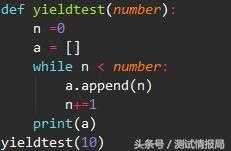
如果說敏感詞過濾,其實不如說是文字的替換,以Python為例,說到詞彙替換,不得不想到replace,我們可以準備一個敏感詞庫,然後透過replace進行敏感詞替換:
def check_filter(keywords, text): for eve in keywords: text = text。replace(eve, “***”) return textkeywords = (“關鍵詞1”, “關鍵詞2”, “關鍵詞3”)content = “這是一個關鍵詞替換的例子,這裡涉及到了關鍵詞1還有關鍵詞2,最後還會有關鍵詞3。”print(check_filter(keywords, content))
但是動動腦大家就會發現,這種做法在文字和敏感詞庫非常龐大的前提下,會有很嚴重的效能問題。例如我將程式碼進行修改,進行基本的效能測試:
import timedef check_filter(keywords, text): for eve in keywords: text = text。replace(eve, “***”) return textkeywords =[ “關鍵詞” + str(i) for i in range(0,10000)]startTime = time。time()content = “這是一個關鍵詞替換的例子,這裡涉及到了關鍵詞1還有關鍵詞2,最後還會有關鍵詞3。” * 10000check_filter(keywords, content)print(time。time()-startTime)
此時的輸出結果是:1。235044002532959,可以看到效能非常差。
正則表達方法
與其用replace,還不如透過正則表達re。sub來的更加快速。
def check_filter(keywords, text): return re。sub(“|”。join(keywords), “***”, text)keywords = (“關鍵詞1”, “關鍵詞2”, “關鍵詞3”)content = “這是一個關鍵詞替換的例子,這裡涉及到了關鍵詞1還有關鍵詞2,最後還會有關鍵詞3。” print(check_filter(keywords, content))
我們同樣增加效能測試,按照上面的方法進行改造測試,輸出結果是0。47878289222717285。透過這樣的例子,我們可以發現,這種做法在效能層面變高了很多,這少可以說提升了幾倍,如果隨著詞庫的增加,這個倍數會成倍增加。
DFA過濾敏感詞
這種方法相對來說效率會更高一些。例如,我們認為壞人,壞孩子,壞蛋是敏感詞,則他們的樹關係可以表達:

用DFA字典來表示:
{ ‘壞’: { ‘蛋’: { ‘\x00’: 0 }, ‘人’: { ‘\x00’: 0 }, ‘孩’: { ‘子’: { ‘\x00’: 0 } } }}
使用這種樹表示問題最大的好處就是可以降低檢索次數,提高檢索效率,基本程式碼實現:
import timeclass DFAFilter(object): def __init__(self): self。keyword_chains = {} # 關鍵詞連結串列 self。delimit = ‘\x00’ # 限定 def add(self, keyword): keyword = keyword。lower() # 關鍵詞英文變為小寫 chars = keyword。strip() # 關鍵字去除首尾空格和換行 if not chars: # 如果關鍵詞為空直接返回 return level = self。keyword_chains # 遍歷關鍵字的每個字 for i in range(len(chars)): # 如果這個字已經存在字元鏈的key中就進入其子字典 if chars[i] in level: level = level[chars[i]] else: if not isinstance(level, dict): break for j in range(i, len(chars)): level[chars[j]] = {} last_level, last_char = level, chars[j] level = level[chars[j]] last_level[last_char] = {self。delimit: 0} break if i == len(chars) - 1: level[self。delimit] = 0 def parse(self, path): with open(path, encoding=‘utf-8’) as f: for keyword in f: self。add(str(keyword)。strip()) def filter(self, message, repl=“*”): message = message。lower() ret = [] start = 0 while start < len(message): level = self。keyword_chains step_ins = 0 for char in message[start:]: if char in level: step_ins += 1 if self。delimit not in level[char]: level = level[char] else: ret。append(repl * step_ins) start += step_ins - 1 break else: ret。append(message[start]) break else: ret。append(message[start]) start += 1 return ‘’。join(ret)startTime = time。time()gfw = DFAFilter()gfw。parse( “。/sensitive_words。txt”)content = “這是一個關鍵詞替換的例子,這裡涉及到了關鍵詞1還有關鍵詞2,最後還會有關鍵詞3。” * 10000result = gfw。filter(content)print(time。time()-startTime)
這裡我們的字典庫是:
with open(“。/sensitive_words”, ‘w’) as f: f。write(“\n”。join( [ “關鍵詞” + str(i) for i in range(0,10000)]))
執行結果:
4。9114227294921875e-05
可以看到效能進一步提升。
AC自動機過濾敏感詞演算法
接下來,我們來看一下 AC自動機過濾敏感詞演算法:
AC自動機:一個常見的例子就是給出n個單詞,再給出一段包含m個字元的文章,讓你找出有多少個單詞在文章裡出現過。
簡單地講,AC自動機就是字典樹+kmp演算法+失配指標
程式碼實現:
# AC自動機演算法class node(object): def __init__(self): self。next = {} self。fail = None self。isWord = False self。word = “”class ac_automation(object): def __init__(self): self。root = node() # 新增敏感詞函式 def addword(self, word): temp_root = self。root for char in word: if char not in temp_root。next: temp_root。next[char] = node() temp_root = temp_root。next[char] temp_root。isWord = True temp_root。word = word # 失敗指標函式 def make_fail(self): temp_que = [] temp_que。append(self。root) while len(temp_que) != 0: temp = temp_que。pop(0) p = None for key, value in temp。next。item(): if temp == self。root: temp。next[key]。fail = self。root else: p = temp。fail while p is not None: if key in p。next: temp。next[key]。fail = p。fail break p = p。fail if p is None: temp。next[key]。fail = self。root temp_que。append(temp。next[key]) # 查詢敏感詞函式 def search(self, content): p = self。root result = [] currentposition = 0 while currentposition < len(content): word = content[currentposition] while word in p。next == False and p != self。root: p = p。fail if word in p。next: p = p。next[word] else: p = self。root if p。isWord: result。append(p。word) p = self。root currentposition += 1 return result # 載入敏感詞庫函式 def parse(self, path): with open(path, encoding=‘utf-8’) as f: for keyword in f: self。addword(str(keyword)。strip()) # 敏感詞替換函式 def words_replace(self, text): “”“ :param ah: AC自動機 :param text: 文字 :return: 過濾敏感詞之後的文字 ”“” result = list(set(self。search(text))) for x in result: m = text。replace(x, ‘*’ * len(x)) text = m return textah = ac_automation()path = ‘。/sensitive_words’ah。parse(path)content = “這是一個關鍵詞替換的例子,這裡涉及到了關鍵詞1還有關鍵詞2,最後還會有關鍵詞3。”print(ah。words_replace(content))
詞庫同樣是:
with open(“。/sensitive_words”, ‘w’) as f: f。write(“\n”。join( [ “關鍵詞” + str(i) for i in range(0,10000)]))
使用上面的方法,將content*10000測試結果為0。1727597713470459。
小結
可以看到這個所有演算法中,在上述的基本演算法中DFA過濾敏感詞效能最高,但是實際上,對於後兩者演算法,並沒有誰一定更好,可能某些時候,AC自動機過濾敏感詞演算法會得到更高的效能,所以在生產生活中,推薦時候用兩者,可以根據自己的具體業務需要來做。
如何部署在Serverless架構下
很簡單,以AC自動機過濾敏感詞演算法為例:我們只需要增加是幾行程式碼就好,完整程式碼如下:
# -*- coding:utf-8 -*-import json, uuid# AC自動機演算法class node(object): def __init__(self): self。next = {} self。fail = None self。isWord = False self。word = “”class ac_automation(object): def __init__(self): self。root = node() # 新增敏感詞函式 def addword(self, word): temp_root = self。root for char in word: if char not in temp_root。next: temp_root。next[char] = node() temp_root = temp_root。next[char] temp_root。isWord = True temp_root。word = word # 失敗指標函式 def make_fail(self): temp_que = [] temp_que。append(self。root) while len(temp_que) != 0: temp = temp_que。pop(0) p = None for key, value in temp。next。item(): if temp == self。root: temp。next[key]。fail = self。root else: p = temp。fail while p is not None: if key in p。next: temp。next[key]。fail = p。fail break p = p。fail if p is None: temp。next[key]。fail = self。root temp_que。append(temp。next[key]) # 查詢敏感詞函式 def search(self, content): p = self。root result = [] currentposition = 0 while currentposition < len(content): word = content[currentposition] while word in p。next == False and p != self。root: p = p。fail if word in p。next: p = p。next[word] else: p = self。root if p。isWord: result。append(p。word) p = self。root currentposition += 1 return result # 載入敏感詞庫函式 def parse(self, path): with open(path, encoding=‘utf-8’) as f: for keyword in f: self。addword(str(keyword)。strip()) # 敏感詞替換函式 def words_replace(self, text): “”“ :param ah: AC自動機 :param text: 文字 :return: 過濾敏感詞之後的文字 ”“” result = list(set(self。search(text))) for x in result: m = text。replace(x, ‘*’ * len(x)) text = m return textdef response(msg, error=False): return_data = { “uuid”: str(uuid。uuid1()), “error”: error, “message”: msg } print(return_data) return return_dataah = ac_automation()path = ‘。/sensitive_words’ah。parse(path)def main_handler(event, context): try: sourceContent = json。loads(event[“body”])[“content”] return response({ “sourceContent”: sourceContent, “filtedContent”: ah。words_replace(sourceContent) }) except Exception as e: return response(str(e), True)
最後,為了方便本地測試,我們可以增加:
def test(): event = { “requestContext”: { “serviceId”: “service-f94sy04v”, “path”: “/test/{path}”, “httpMethod”: “POST”, “requestId”: “c6af9ac6-7b61-11e6-9a41-93e8deadbeef”, “identity”: { “secretId”: “abdcdxxxxxxxsdfs” }, “sourceIp”: “14。17。22。34”, “stage”: “release” }, “headers”: { “Accept-Language”: “en-US,en,cn”, “Accept”: “text/html,application/xml,application/json”, “Host”: “********”, “User-Agent”: “User Agent String” }, “body”: “{\”content\“:\”這是一個測試的文字,我也就呵呵了\“}”, “pathParameters”: { “path”: “value” }, “queryStringParameters”: { “foo”: “bar” }, “headerParameters”: { “Refer”: “10。0。2。14” }, “stageVariables”: { “stage”: “release” }, “path”: “/test/value”, “queryString”: { “foo”: “bar”, “bob”: “alice” }, “httpMethod”: “POST” } print(main_handler(event, None))if __name__ == “__main__”: test()
完成之後,我們就可以測試執行一下,例如我的字典是:
呵呵測試
執行之後結果:
{‘uuid’: ‘9961ae2a-5cfc-11ea-a7c2-acde48001122’, ‘error’: False, ‘message’: {‘sourceContent’: ‘這是一個測試的文字,我也就呵呵了’, ‘filtedContent’: ‘這是一個**的文字,我也就**了’}}
接下來,我們將程式碼部署到雲端,新建serverless。yaml:
sensitive_word_filtering: component: “@serverless/tencent-scf” inputs: name: sensitive_word_filtering codeUri: 。/ exclude: - 。gitignore - 。git/** - 。serverless - 。env handler: index。main_handler runtime: Python3。6 region: ap-beijing description: 敏感詞過濾 memorySize: 64 timeout: 2 events: - apigw: name: serverless parameters: environment: release endpoints: - path: /sensitive_word_filtering description: 敏感詞過濾 method: POST enableCORS: true param: - name: content position: BODY required: ‘FALSE’ type: string desc: 待過濾的句子
然後透過sls ——debug進行部署,部署結果:

最後,透過POSTMan進行測試:

額外的話
對於敏感詞庫去那裡獲得問題,github上有很多,可以自己搜一下,中文的英文的都有。我這裡只是一個例子;
這個API使用場景,完全可以放在我們的社群跟帖系統/留言評論系統/部落格釋出系統中,防止出現敏感詞彙,導致不必要的麻煩。